Google Sign in #
After buying a Raspberry Pi and starting my own home laboratory I got addicted to self-hosted services. Of course I can stop any moment, but until then I needed to do it securely. One of the problems I faced after adding another instance of rss reader was authorization. Not every service provides even basic password authorization and I wanted to have some universal, but reliable solution. Fortunately, Cloudflare Zero Trust can add a security layer between your service and the rest of the world, and with the help of ChatGPT, I quickly managed to add OTP1 to my homepage instance. It was fine, but I hated going to my inbox every time I wanted to open homepage, mostly because I didn't want to see my 500+ unread email count again. So, I asked my AI friends if I could add Google OAuth instead, and the answer was yes!.
Unfortunately, none of the instructions generated by LLMs were correct, so I had to search the internet2, do experiments and recall the days when engineers had to solve problems without AI.
Prerequisites #
- Free account in Cloudflare with configured Zero Trust
1. Create OAuth Credentials in Google Cloud #
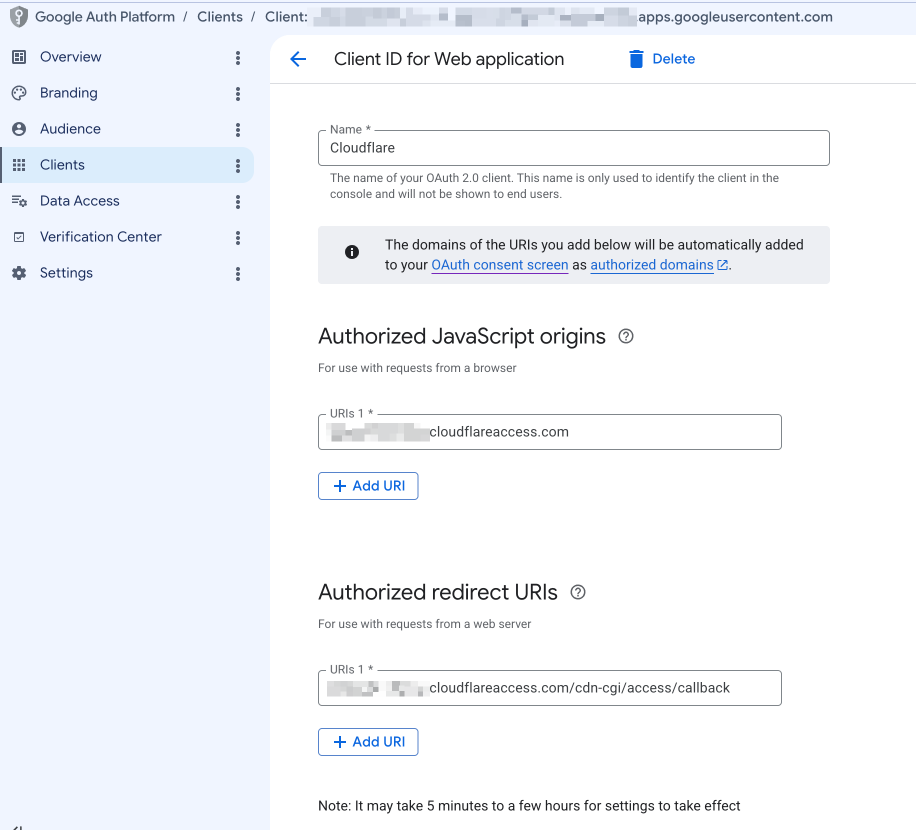
First, we need to prepare our Google Credentials. Go to Google Cloud Console https://console.cloud.google.com/apis/credentials?project=yourproject (assuming that a project is already created) and click "+ Create credentials" -> "OAuth Client ID".
The name doesn’t matter, we can put anything there. What's important here:
Javascript Origins
https://<your-team-name>.cloudflareaccess.com
Redirect URIs has to point back to our Cloudflare:
https://<your-team-name>.cloudflareaccess.com/cdn-cgi/access/callback
Find your Team Name: If you don't remember your exact Cloudflare team name, you can find it in the Cloudflare Zero Trust dashboard by navigating to Settings > Team domain.
After creation, save your OAuth Client ID and Client Secret.
2. Creating a Login Method in Zero Trust #
Go to Cloudflare Zero Trust dashboard > Integrations > Identity Providers. Create a new provider (name still doesn't matter), put your OAuth Client ID and Client Secret there, and save.
3. Adding Policy #
We're almost there. Go to Cloudflare Zero Trust dashboard > Access control. First, create a proper policy:
Policy rules: Include > Emails > your email
Action: Allow
Policy session duration: 24 hours (or your preferable duration).
We can reuse this policy for any service we add later. Now the final step
4. Adding Google OAuth to your service #
Still in the Access control section, go to Applications.
Create a new application with the following settings:
Destinations: Public hostname -> your service hostname (can be multiple hostnames)
Access policies -> the policy we created in step 3
Authentication -> "Allow all available identity providers" or select Google Auth identity created in step 2
Press "Save"
5. Usage #
Now you can open your custom domain and see the Cloudflare Access page instead of your service homepage. Log in using your Google Account (the one we configured in step 3) and for the next 24 hours we can use it as before.

Conclusion #
I started to use Cloudflare for my personal projects not so long ago and am still trying to figure out some details, but generally I'm totally satisfied with it. Besides OTP and Google OAuth you can add GitHub, Facebook, LinkedIn, SAML and other providers that I haven't even heard of.
-
This article helped me a lot Protecting Your Home Server with Cloudflare Zero Trust – AkitaOnRails.com, but Cloudflare and GCS interfaces changed since article was written, so I made a note for myself from more fresh point of view. ↩︎